Showing posts with label scrappingclearly. Show all posts

Wednesday, 23 May 2018

{ScrappingClearly} Farewell & Thank You

Well, I would be lying if I didn't say that this post was a little hard to write however, the time has come for me to step away from ScrappingClearly. 

Before I go any further I firstly want to thank Kylie for the incredible opportunity she gave me when she offered me a spot on this Design Team back in February of 2016. You can see my intro post over on this link!

Over the course of my time here I have not only had so much fun but I have learnt a lot, been inspired by some incredibly talented designers on the team and oh boy, has my heart been filled with such joy seeing all of your kind comments and more importantly, learning I have inspired something in you to create!!

I am not sharing anything new with you today but sharing some of my faves from my time on this amazing team. I will link to each post so if you'd like to go back and read/see more you can and I will also link to any process video's that I have shared so grab a cuppa and come on a bit of a ride back in time with me! Oh, and these are not in any particular order ;)


First up, this is not only one of my fave layouts for this team it is one of my all time, absolute favourites layout of  EVER. My boys in their most "them" pose, a simple page with a love note of sorts tucked in behind the photo for them as they grow up. Blog post for this is here.


This PL page I designed with my very first DT kit from Kylie and I still love this range. This is our closing page in our 2015 PL album. Blog post is here.


I'm not sure what it is I love about this page but I do love it! I think because it is so soft and feminine and for me, I know that stretches my creativity. Blog post is here.


This one was around the time I stopped despising fussy cutting quiet as much as I use to! Those florals are just gorgeous and as soon as I saw them I heard them beg me to cut them out!! Blog post is here. Process video is here.


This chalkboard heart Heidi Swapp marquee piece. It still hangs on my door to my craft room. 
You can see the blog post for this one here.


A page about me. This was created in 2016 and the photo was on my 36th birthday in July. 
Blog post can be seen here. And YT process video can be seen here.


This one was for a challenge as and I really love the simplicity and colour scheme! Blog post can be seen here and process video is here.


This page was done as I was really finding my feet with mixed media. I created this page for a fun CC that we did at ScrappingClearly and it was my challenge piece - from memory - a colour challenge and I just love this page! No blog post for this one! But there is a process video here.


An art journal page! My confidence has certainly grown in mixed media and honestly, I feel most confident when I am making a mess ;) This was also done for a CC. One of the challenges was a top 10 challenge and I chose my top 10 movies and really love how this turned out! Blog post is here. And process video is here.


Another scrapbook page and this one was done this year - in fact I made it for the February challenge and I just really love the way it came out! Blog post is here and process video is here.


And last, but not least, my minc mini album. Something WAY out of my comfort zone. Something so not "my thing" but I really love how it turned out. In fact, I love it so much that perhaps (maybe!!) I may create a few more as times goes on!! These photo's of my youngest, though I have them printed at 6x6 and in his album, I have not really done anything with so I love that they now have this special little album. Blog post can be seen here and there is also a process video here.

That is it for me!

Once again, a massive thank you to not only Kylie but to all of the other girls, both past and present, on the DT, you have made my journey so much fun and the support we have all shared has been incredible! 

Also, a big thank you to all of my supporters, your kind words mean so much and I really am grateful. Though this is goodbye to the team I will still be around in the Share & Inspire group and maybe I will even play along with some future challenges!

Melinda

Thursday, 17 May 2018

Hey, hey scrappers! I'm here with you today sharing my latest creation for ScrappingClearly!


You can watch the process video below, just click play and enjoy! Make sure, if you haven't already you subscribe and if you like what you've seen leave me a thumbs up!!


I started this page by diving into my ScrappingClearly stash and found these awesome Heidi Swapp September Skies papers that really spoke to me. I had fussy cut that big floral piece from Beautiful Bouquet quiet some time ago and it sat and sat and sat and now it is stuck!!


I also had partial sheets of both the Mountain Trail (B side) and Light Spectrum and thought they worked really well together with the floral so there was my base!

I have added in some mixed media, of course and started with some Scribble Sticks and the packaging technique and then I grabbed my Distress Oxide Ink in Carved Pumpkin and got more of the colour I was after.


I have used a couple of strips of washi from the Teresa Collins Urban market washi pack to break up the patterns and work as my neutral.

I added in some splatters using the Scribble Sticks in Tangerine and I made a mix of Night, Umber and Black for the darker blue splatters.

A couple of paper layers behind my photo using more of the Heidi Swapp papers and also the Teresa Collins Something Wonderful "Printed Paper".


My title was built with these Heidi Swapp Black Glitter chippy alphas and these Teresa Collins Something Wonderful Word Stickers.


I finished off with one of the Heidi Swapp puffy stickers from this pack and a few word strips from my box of goodies.


Lots of journalling and my page was done! I love the bright colours of this collection and love how all those bold and bright patterns still worked together to create a page I am happy with!

Remember, documenting us and our stories, both big and small, are just as important in our albums as everyone else's story so when an idea jumps into your head, run with it ;)

I hope I have inspired you to put some new patterns together, or perhaps even to tell one of your stories! Please remember to share over in the ScrappingClearly Share & Inspire group, we love seeing your creations!

Until next time, happy scrapping!

Melinda

Tuesday, 8 May 2018

{ScrappingClearly} Project Life 2018 ~ WK 2 Insert

Hello ScrappingClearly friends!! Today I am here once again sharing some more Minc inspiration!

Here is my page front


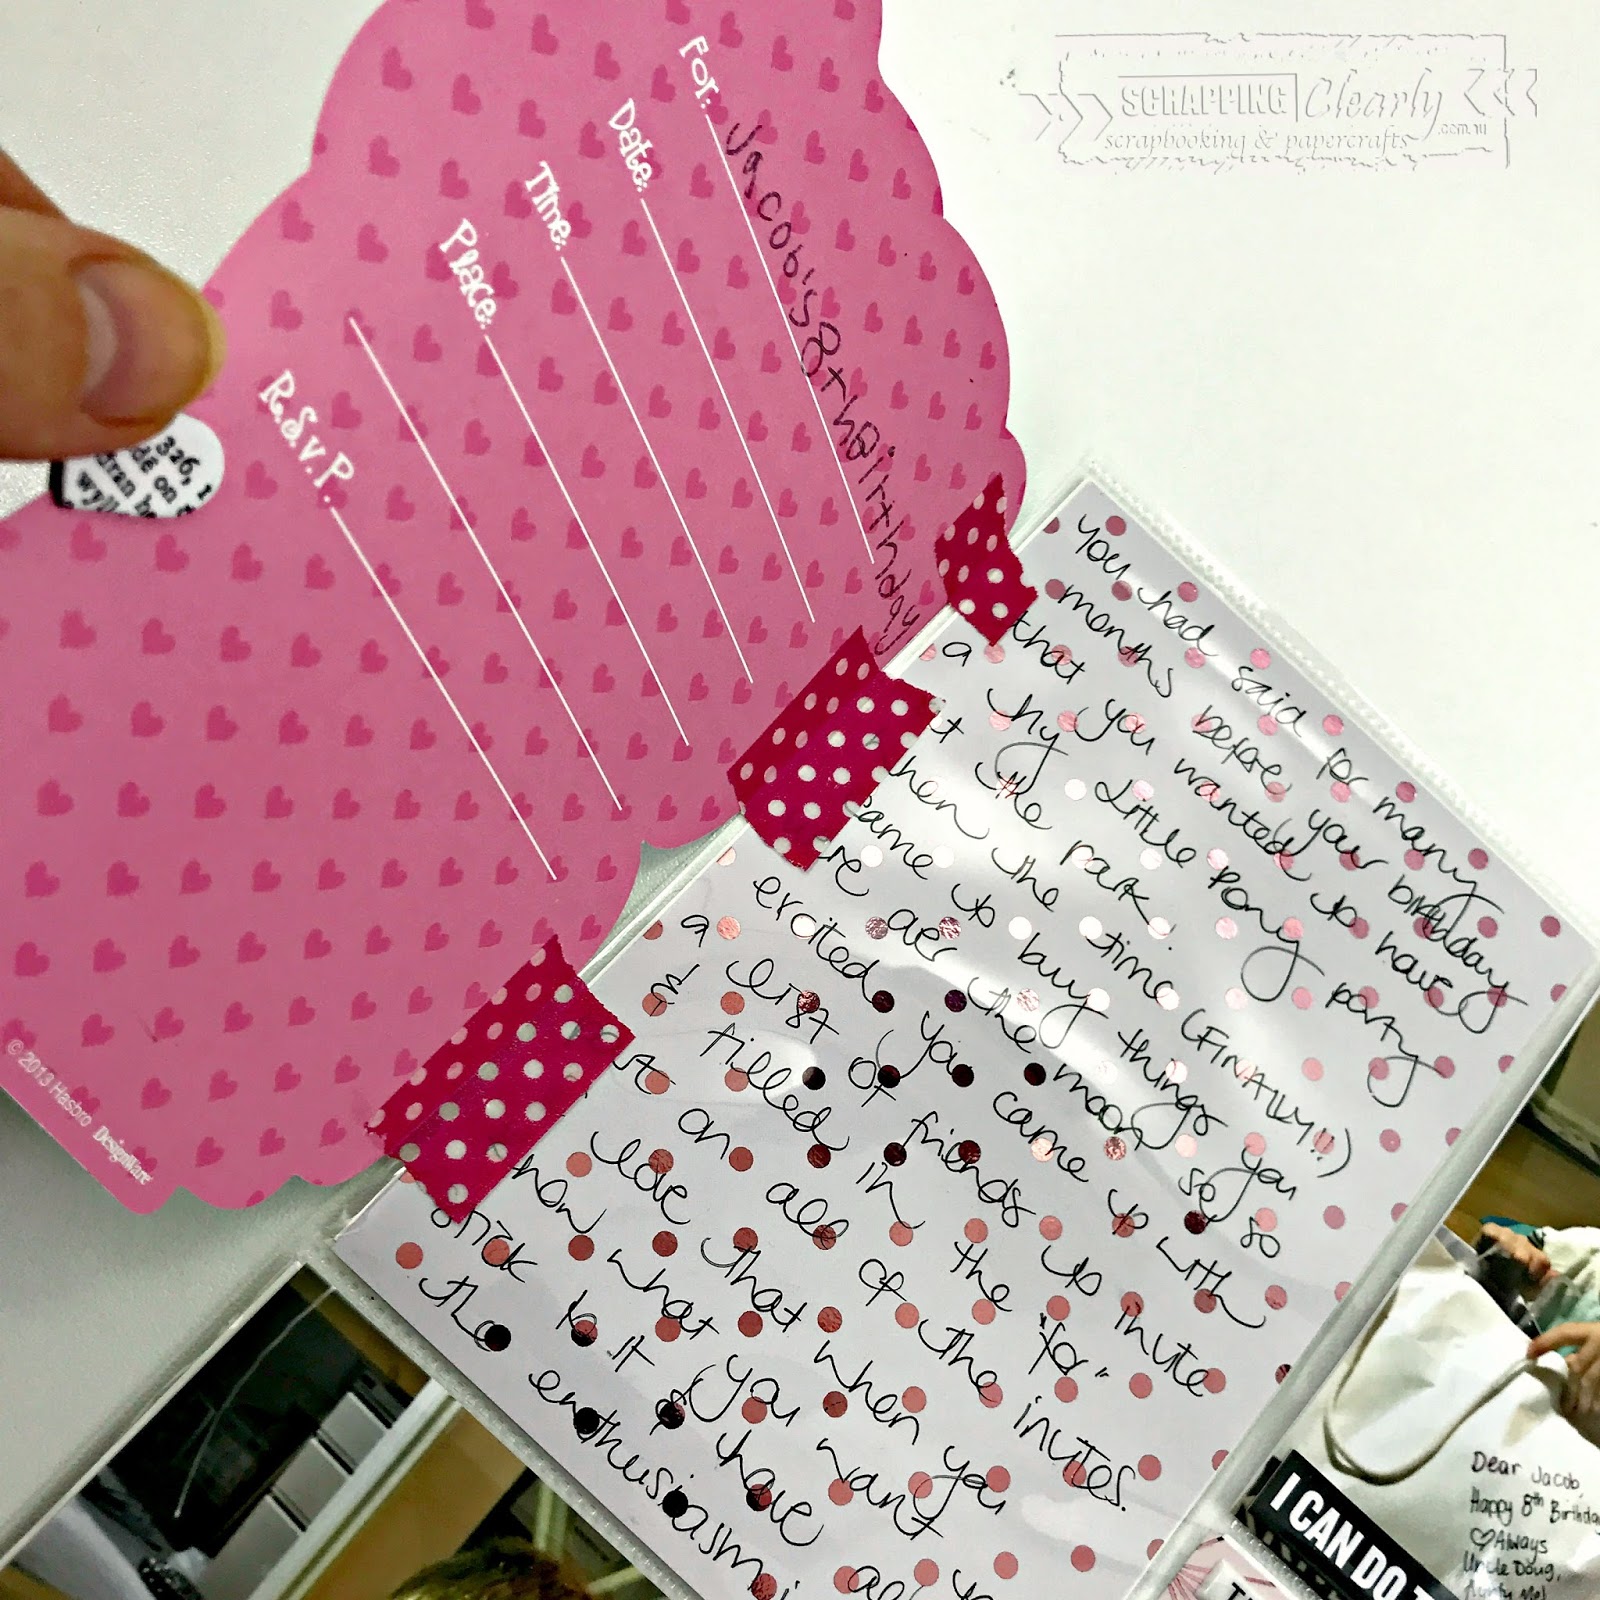
This is an insert in our 2018 Project Life album and I am super happy with how it came out. I mean, what better reason to use beautiful pink foil on all the things than when you are documenting a My Little Pony themed Birthday Party, right?!


I've used the 6x6 Minc Paper Pad paired with the pink foil for the bases of almost all of my cards for this spread but I also pulled a 3x4 card cut from the Teresa Collins "Alpha" 12x12 paper from the Urban Market collection.


For both the front and the back of the spread I have used quiet a range of different things including my foiled 6x6 papers (all in pink foil), some Cocoa Vanilla Studios "You Rock" Rubber Charms, a puffy sticker from this pack by Heidi Swapp, an ephemera piece from the Pink Fresh Studio "Boys Fort" ephemera pack, a mini Insta frame by Heidi Swapp and most of the rest of my pack of chipboard heart stickers by Studio Calico. 


Like I said, quiet a range, quiet a mix but I am really happy with the end result! Oh, and I almost forgot, I added in a few of the Pink Fresh Studio "Boys Fort" Phrase stickers. I love the little pops of black throughout the spread!


My boy had done alot of the writing on the invites himself so I had an extra (perhaps an intentional "error" ;) ) and wanted to include that also to see just what his almost 8 year old writing looked like.


I'm not loving that washi tape - it covers up the writing and is way too bold for what I wanted - I will find something else and fix it up ;)

And that, my friends is another page in our 2018 album - I think the total is now like 5 or something lol - but it is another in there!!

I do have a short process video of this coming together if you'd like to see! Just click play below and enjoy!


Until next time, happy scrapping!
Melinda
xx

Saturday, 28 April 2018

{ScrappingClearly} Crazy Even In Emergency ~ A Scrapbook Layout

Good morning and welcome to my blog this weekend! Do you have any scrappy plans? I do and I hope to be super productive, as always I have deadlines and things I want to create!!

Anyway, I'm here today sharing my newest page created for ScrappingClearly. I have used the very fun Photo Play Boys Rule Collection. I am documenting an interesting story today of my boys being maniacs, even while we were in emergency with my husband last July. The journalling sums up how well they coped and all in all what an awesome job they did in such a gloomy situation!


I was inspired by a couple of stickers in the collection and built my page starting with those....


I also created a process video which you can see below. 


I started by tearing 3 pieces of patterned paper from the Collection Pack (Seeing Stars, My Boy and Smash Bang) and layered them on the right hand side of my white background paper and then added a coat of white gesso both over the bottom of the papers (where my photo's were going) and onto the white cardstock.


Time, of course, for some messy fun! I started with a text stamp in Black Archival ink and then used a Dotty Texture stamp with Dark Blue Archival Ink.

And then more colour!! Back, again, to my Distress Oxides! I was going to use LOTS of colours but then ended up using only Squeezed Lemonade and Spiced Marmalade and the packaging technique over where the gesso and stamping was.


I also added some splatters using the Faded Jeans Distress Oxide watered down as I felt the white half of the page needed some of that darker blue to balance the right side.


Once that was all dry I added all my stickers and some messy thread in both a dark blue and a bright lime green and I love how that brings all the colours all through the page. The black word stickers are from the Boys Fort Phrase Stickers sheets.


Last off was my title using the Black Glitter Heidi Swapp chippy alphas paired with the fun Mini Alphas from Pink Fresh Studio's Boys Fort collection.


I have to document the actual story of the reason we were at the ER in the first place but am kinda stuck - it's one of those stories that I certainly feel like I want in our album but am unsure how to add it in! Have you shared one (or more!) of those types of stories in your albums? How? Please do share, I would love to hear!!

Anyways, I shall leave you here with my last close up! I love the craziness and hectic feel of this page because, for so many reasons, that was exactly how those few hours felt! Oh, and just for the record, in case anyone is wondering, hubby's finger is almost completely healed and you wouldn't even know that he had a run with a table saw last July!!


Until next time, happy scrapping!!


Melinda

Monday, 16 April 2018

{ScrappingClearly} Minc Mini Album

Hello and welcome to my blog on this Monday!! Already! I for one could have added a couple of extra days to our weekend as I was lucky enough to be away, just my hubby and I, celebrating our 10th wedding anniversary! No crafting but lots of wine tasting for me, how about you? Did you get your craft on?!

Anyways, today's share is for ScrappingClearly and it is VERY different for me! Like, VERY!!! Kylie sent me these lamination labels in the Minc range and I had ZERO idea what to do with them until one day, bam! Inspiration struck! A mini album! So that is where this mini album started - some labels!!


I pulled out some more bits from not only my latest kit from Kylie but some older goodies she sent me - seriously these DT kits she sends just keep giving!! I have used lots of different bits and pieces are here are the direct links to all of the goodies I have pulled that are available in store:

Heidi Swapp Minc Lamination Labels
Heidi Swapp Minc Tags
Heidi Swapp Minc Chipboard Frames
Heidi Swapp Minc Alpha Stickers
Heidi Swapp Minc Pink Foil
Heidi Swapp Minc Mint Foil
Heidi Swapp No Limits Stix
Heidi Swapp Puffy Stickers
American Crafts Clothespins
American Crafts Clips
Studio Calico Chipboard Heart Stickers
Crate Paper - Maggie Holmes - "Flutter" 12x12 Paper
C'est La Vie ephemera piece

At this point I am going to say, make sure you have a cuppa with you - I have photos of each page to share and a little "this is what I used" so sit back and enjoy!


What I love about the "cover" is all the different angles and the bits and pieces poking out and around all the sides with nothing being exactly square or neat!


For this I have used 3 pieces from the Minc Tags pack and one of the AC clips. I used a combo of the pink and mint foils as well and so I am not repeating myself on every photo I have used pink foil on the mint coloured pieces and mint foil on the pink pieces ;)


The acetate tag is from the C'est La Vie ephemera pack. I have used the Minc Alphas (mint foil), one of the Heidi puffy stickers (there is another on the back as well!) and I pulled apart one of the Heidi Stix to just use the one camera.


The base here is one of the laminated tags and I very simply added in one of the AC chippy hearts.


Before I say anything else this is one of my all time absolute favourite photos of my littlest guy. I just LOVE it!! We have this in colour on our wall as a big canvas <3<3<3

For this one I have used a Minc Tag and pink foil (really hard to photograph!) for the page base. A fussy cut butterfly from the Flutter paper and another of the AC clips.


My next laminated tag, this one paired with a AC clothespin. Another of my all time faves!!


My base is one of the Minc Tags. The pink stripes are printed and then the green is foiled. I added another of those adorable AC clips here too.

I'm sure by now you have noticed that I have not at all overthought this process and kept it pretty simple from page to page. I really feel that having my photo's in black and white and printing them all to 2" x 3" made making decisions so much easier!


Another of the laminated tags. I felt the florals and his gorgeous squishy face was enough for this so didn't even bother adding anything else!


A non-photo page! Another tag from the Minc Tags package and another AC chippy heart. Oh, and pink foil.


I totally and completely forgot we managed to get this photo until I printed them out for this album and oh my stars!! I should have known back then (he was 8 or 9 days old!) he was going to be my mischievous little man!! However, another laminated tag and another fussy cut butterfly from the  Flutter paper. Oh, and I trimmed this photo too ;)


I had a few different ideas for these frames but really love what I ended up deciding to do!! So, this has 2 photo's and 2 of the Minc Frames as the page base and I have simply adhered those back to back. I added another of the AC Clips as a place to hang this page from the ring and voila, done! The front has the text which is foiled in pink.....


and the back has the stripes which I foiled in mint. I will say it again, the foil is really tricky to photograph well but the mint colour is way more mint and pretty than this photo indicates!


This piece is actually what inspired me to choose the photos I chose to work with! My little family of 4! We are far from perfect but we love, we laugh and we have each other and that is enough <3 This came from the Minc Tags set and is a minty colour and I have added pink foil. And an AC chippy heart.

And that is my album in it's completion! I really, really love it! Mini's are not my "norm" but sometimes it is super fun to step away and challenge yourself. I really do adore my end project and so too do my boys, so I'm calling that a win!!

I do have a video of my process and you can see that below and you will see how much I didn't really over think the process or make it complicated.


I hope you enjoy and I hope I inspire you to get your creative on!!

Have a fantastic Monday and I'll be back again later in the month!

Melinda


Wednesday, 4 April 2018

{ScrappingClearly} Gift Tags with the Minc

Hello crafty friends and welcome to my blog today! Today's share is for ScrappingClearly and I have something a little different to share with you but it's something quick and easy and it made a great gift!!


Yep, lots of little tags which I made for my Mum for her birthday. And before you ask, yes, this is what she asked for!! My Mum crochet's and has found herself with enough beautiful things to last a life time (a bit like us with our paper, right?!) and has decided it's time to sell some off and wanted tags to go on them so with that in mind off I went!!


I started with the GORGEOUS Minc paper pad - brights - these colours are divine!! and got designing on my computer in Word. A very simple design and if you are interested the font I used is called PN Octopus Socks Script. I had my document printed onto the card through a laser printer so I could Minc away.


I chose the holographic foil - it's "neutral" enough to go with all the colours and oh so pretty, I love it!! Because I have the 6" Minc I had to cut my pages down to fit into the carrier thingy - yep, technical ;) so had to do multiple runs through the Minc. You will notice in the close ups some of the foiling is not perfect, I think that was the print and not the Minc itself or the foil as I have not had a single other issue with either! I am quiet happy with the less than perfect look, I mean, I don't often do neat and perfect in either my scrapping or real life ;)

I die cut all of my tags using a metal die from my stash but you could so easily use another tag as a template and hand cut, use a cameo or simply just freehand some tags or any other shape that appeals to you.


I used a paper punch from my stash paired some of the offcuts from around the tags and also some vellum to create some very simple embellishments for each tag (you could of course use ANY type of printed vellum as well, that would look great too!), lightly stuck the layers together and ran them through my sewing machine. A little bit of glue and my final touch was some twine.

Like I said, a pretty simple project but Mum loved it and it was fun to put something a little different for together!

There is a process video for this - it's not very long - but I hope you enjoy!


Thanks so much for stopping by, until next time, happy scrapping!

Melinda