Tuesday 28 May 2019

CUT to YOU | Let's Get Crafty

Hello my scrappy friends and welcome to my blog today! I'm sharing my latest DT project with you for CUT to YOU! Yep, I said project and not page again!
I actually created this a little while ago as a gift but couldn't share it until this month as the cut file was one of the fantastic freebies Gwen offered for iNSD! Did you manage to snag yourself this cut file for free? If not head over here to the Etsy store and you buy it now!
This is the project I created and it is actually in a frame by Ikea called "Ribba". The inside dimension of the frame is about 9" square and I thought the perfect size for an OTP project that wasn't ginormous or too heavy!
I started by cutting the title and the scissors on some smooth white cardstock keeping in mind the limitations of the inside of the frame.
I decided to back the whole title with some vellum, except for the heart in the middle of the 'A' as I had come up with an idea for the background that did not involve any mixed media lol The person this was gifted to is a (very talented!!) quilter so I used her craft to inspire my background for this!
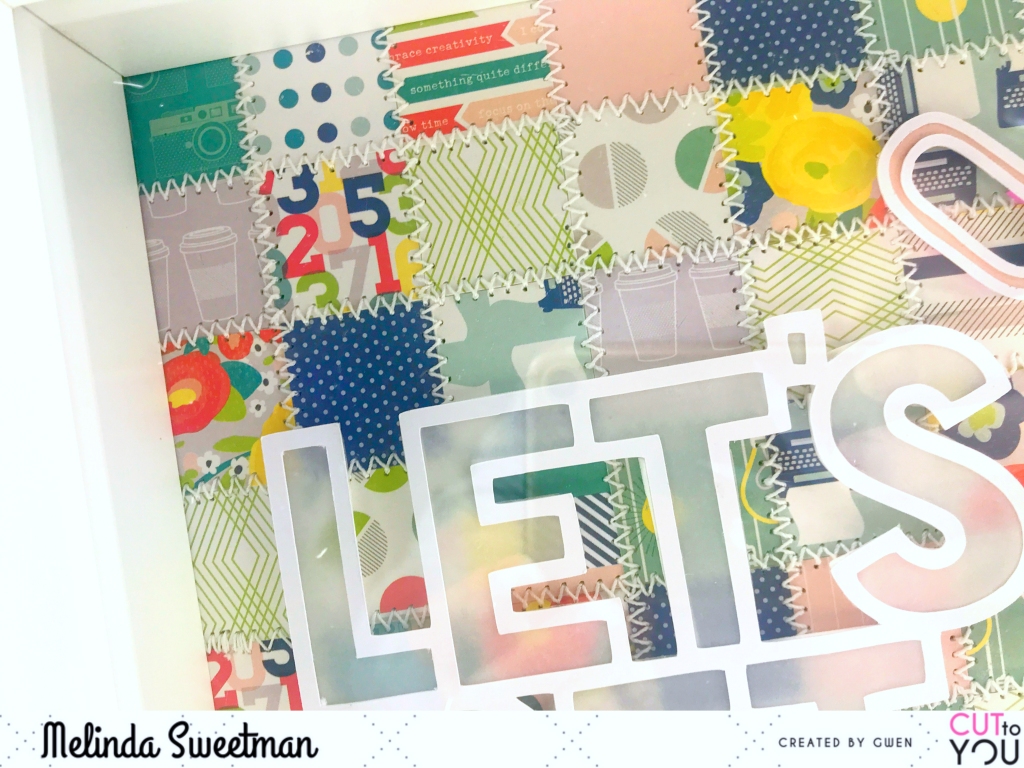
I have pulled out an older 6x6 paper pad by Shimelle and cut a heap of 1" squares to create my background. Without much rhyme or reason, other than not having 2 of the same pattern next to each other, I randomly stuck down the squares to form a kind of quilt like pattern onto some cardstock. To really go with that idea of quilting I also used my sewing machine and did a zig zag stitch on every line, both horizontally and vertically.
With the main part of my design good to go I got to work on my scissors! I've used the same pink from the heart in the 'A' to back the handles. (cause who wouldn't love a pair of pink handled scissors?!)
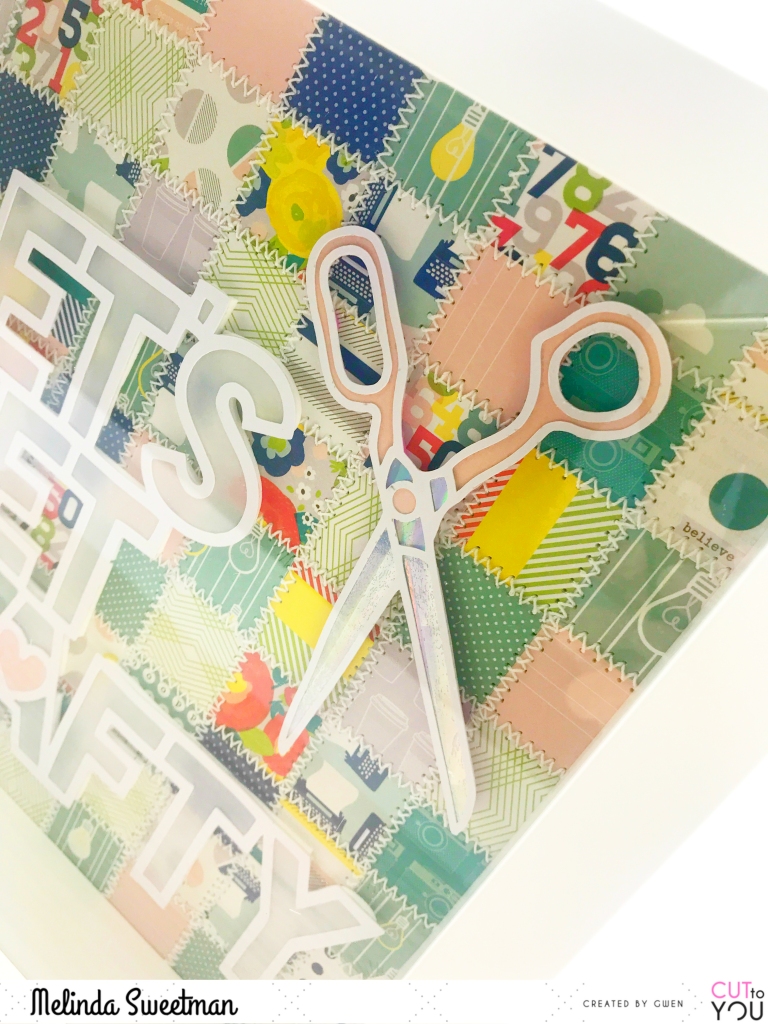
Next I have created my own holographic paper for the blades. This was really easy to do with my Minc machine and the Minc mist! I simply painted some of the mist onto some scrap paper, let that dry thoroughly and then ran my scraps through my Minc with the holographic foil and voila!! I love how these scissors came out!
Time to put it all together! I used foam adhesive around the whole title and also behind the scissors and then used my wet adhesive to stick it all to my "quilted" back ground.
I have recorded my process for this as well so I do hope you enjoy!


This was a super fun project to create and it would be so easy to replicate! And using different papers you would get a completely different look so next time you have a gift to give, maybe you could think a little outside the norm!


I hope you have enjoyed and I shall see you next month my next share!
Happy scrapping!
Melinda
x
Tuesday 14 May 2019

CUT to YOU | Together

Hello fellow creatives I'm so happy you have visited me here today! I'm sharing another 12x12 layout for CUT to YOU and playing along with the Scrap The Girls May challenge as CTY is this months sponsor.


We had this sketch to play along with and as soon as I saw I thought one of the brand new cut files would be perfect so I cut the Frames Background cut file on white card stock.


And here is my page! I've gotta be honest and say that this is nothing like what I had "planned" out in my head but I do really love it! I kinda got a bit carried away painting lol


I wanted to crack into my Cocoa Vanilla Studio Happiness collection so pulled out the pattern paper with ALL the colours and matched those as best I could with some Distress Ink Pads. I've used Faded Jeans, Worn Lipstick, Cracked Pistachio and Peacock Feathers.


I had intended on colouring just the full blooms in this cut and backing the open ones but, like I said, I got carried away with my painting! The technique I have used to colour is super easy. All I did was smoosh my ink pad onto my craft mat and then used a water colour brush to pick up the colour and paint it onto my cut file. Easy!


I made sure I had different shades of the colours happening which just mean applying a second or third coat and then blending the edges and I really love how this turned out!


I have backed the main frame with the photo of my Mum, my sister (little sister that is lol), myself and my Aunty from my Mum's birthday lunch earlier this year and then backed all of the other frames with pattern papers from the Happiness collection. I ended up backing the open flowers with some plain vellum and love the softness it adds.


I also had other plans for the background paper! I was going to use the beautiful wood grain that is in this collection but when I happened to move my cut file to find something it ended up on this gorgeous pattern and I just LOVED the way it looked! So I shifted gears again!
I popped the cut file up on some old cardboard for dimension adding layers to the pieces that were the furthest away from the centre and then leaving the open leaves and flowers without any adhesive.
Before I stuck that down however I decided I wanted to mute out some of that pattern a little bit so I used some white gesso and my finger to spread some behind where all of my page elements were going and then stuck down the cut file.


Finally, some embellishing. With all the pattern on the background paper I didn't want to add too much so I simply used my Pixscan mat in my Cameo software to fussy cut some butterflies from on of the other pattern papers and added of those (in pink) to the centre of the big open flowers.
I added tassles from the ephemera pack (OMG aren't they gorgeous!), a title piece from the Midnight collection as well as a sticker that says Wonderful. I pulled in a couple of wood grain labels from my stash to add my journalling, added in some white ink splatters and my page was done! I also have a process video for you linked below so I do hope you will pop over and that you enjoy!


That is it for me for today. This page turned out completely different to what I had envisioned but I really do love the end result and love that I got this photo scrapped! Thanks for stopping by and see you next time!


Melinda
x

Sunday 12 May 2019

Anna's Craft Cupboard | Simple Stories - Oh Happy Day | May 2019

Hello, hello my scrappy friends!!

It's been my turn over on the Anna's Craft Cupboard blog again this week featuring the layouts I created using the oh so fun and vibrant Simple Stories Oh Happy Day collection.

First up I had this floral number called "Remember, You've Got This" A pretty page and a little reminder to myself. With somewhere to write. That is hidden ;)


You can find the full blog post over here and you can see the process video below


Second was this one! A fun page (I just love, love, love this photo!!) of my biggest guys 9th birthday!


You can see the full blog post over on the Anna's blog here and you can see my process video below


Next up was this fun Easter page! If you have followed me a little while you will know that every year we set a trap for the Easter Buuny. And every year we fail to catch him lol


The full blog post on the Anna's blog is here and my process video is below


And lastly for this month is another Easter page. I seriously just couldn't go past the adorable Annabelle acrylic shapes. Aren't those bunnies the cutest?!


Full blog post is here and my process video is below


I hope that you have enjoyed these shares this week! I know I had lots of fun playing with this fun and bright collection which you can find over in the Anna's Craft Cupboard store here!

This post is going live on Mother's Day so however you celebrate, with whoever you celebrate I hope you have a lovely Mother's Day today!

Until next time, happy scrapping!!
Mel

xx


Friday 3 May 2019

STB May 2019 | Oh My Heart

Hello, hello!!! Welcome back to my blog once again today! 

As it is the beginning of a new month I have another DT project to share with you and this one is for Scrap The Boys! Being May it is all about Mother's Day!


I went back through my archives of photos and found one of my first Mother's Day when I had 2 babies to love and decided to scrap that! I love the way my big guy is looking at my little guy and the cheeky grin on the little guys face ;)


As you can see I have used a cut file as the main part of my background and this, of course, has come from CUT to YOU. This is an older file called Floral Filled Heart #2 but I just love it and am so excited that I got it onto a page!

I have used, almost exclusively, Cocoa Vanilla Studio goodies to pull this page together and really love the end result! You can see my page come together below in my process video.


As I mentioned in my last post, life has been nothing short of busy so another short and sweet blog post today with lots of photos! I do hope you enjoy!


Head over here for this month's STB challenge and to see all of the other amazing DT inspiration that has been shared! Also, that is where you will need to go upload your take on the challenge!

Thanks for stopping by and see you again very soon ;)

Melinda
xx

Wednesday 1 May 2019

Kraft+ May 2019 | Holly Jolly

Hello, hello and welcome to my blog today!

Once again it's a new month and I have my first share for the month for Kraft+ Challenges and I seriously had so much FUN putting this page together!


We have this great sketch and colour combo to play with this month and I hope you find it as inspirational as I did!!


The colour combo made me think of Christmas so I hunted through my photo stash and found this one of my little guys chatting to Santa from last year and ran with that and came up with this

Like I said, I had SO MUCH FUN putting this together and you can see my full process below, just hit play!


And here are a few close ups!


This post is a bit short this month, we've had a lot happening with school holidays, Easter, ANZAC Day and, of course, my big craft room move (if you'd like to see my new space click here!) and life!!! 

Make sure you head over here to the K+ blog for this month's challenge inspiration post and to load up your take on this fun sketch!

I hope you enjoyed my share today and I will be back again soon with another!
Until then, happy scrapping!

Mel
xx